

Acrylic letters are a stylish and professional way to display names, logos, and signage in offices, retail spaces, and even homes. Their clean, glossy finish gives any wall a premium look — but here’s the best part: you can install them yourself with a few tools and some precision.
Whether you’re planning to decorate a reception area, install branding in a showroom, or personalise a home space, this DIY guide will walk you through how to install acrylic letters on a wall like a pro.
Why Choose Acrylic Letters?
Before we get into the steps, let’s quickly look at why acrylic letters are such a popular choice:
- Sleek and modern look
- Lightweight but durable
- Customizable in colour, font, and thickness
- Suitable for both indoor and outdoor use
- Professional appeal without a high cost
Swami Ji Outdoors, a trusted name in signage and printing in Jammu, often recommends acrylic letters for businesses looking to upgrade their branding with style. From laser-cut precision to high-gloss finishes, they offer end-to-end acrylic solutions.
Tools & Materials You’ll Need
To get started with the installation, gather these supplies:
- Pre-cut acrylic letters
- Paper template or stencil
- Masking tape
- Spirit level
- Pencil or marker
- Adhesive (like VHB tape or silicon glue)
- Drill and screws (if using stud mounts)
- Measuring tape
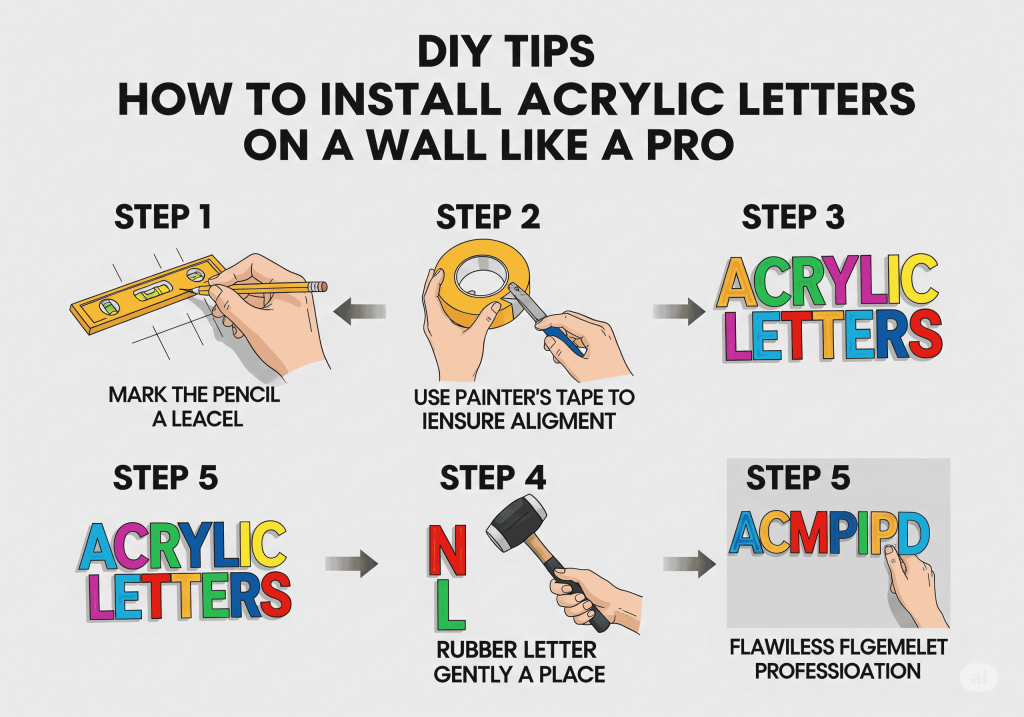
Step-by-Step Installation Guide
Step 1: Decide Placement
Choose a clean, flat wall surface — ideally painted or primed. Acrylic letters can be used for:
- Brand names behind reception desks
- Inspirational quotes at home
- Nameplates outside cabins or offices
- Directional signage in corridors
Swami Ji Outdoors helps customers choose optimal sizing and contrast colours to make acrylic letters pop, especially in indoor lighting or spotlight setups.
Step 2: Create or Use a Template
A paper template is crucial for accuracy. Most acrylic letter sets come with a printed stencil, showing exact spacing and alignment.
- Tape the stencil to the wall using masking tape.
- Use a spirit level to ensure the text is straight.
- Mark the positioning of each letter using a pencil.
Pro Tip: Always step back and check from a distance before you start sticking or drilling.
Step 3: Clean the Wall Surface
Dust, grease, or texture can reduce adhesion. Use a mild cleaner or alcohol wipe to clean the area where the letters will go.
Make sure the wall is completely dry before proceeding.
Step 4: Choose Mounting Method
There are two primary ways to mount acrylic letters:
a) Double-Sided Tape or Adhesive (Easy Method)
Ideal for lightweight letters (3mm–5mm) and smooth indoor walls.
- Apply VHB tape or acrylic glue to the back of each letter.
- Carefully press each letter into its marked position.
- Hold firmly for 10–15 seconds.
- Let it cure for a few hours (based on adhesive instructions).
b) Stud Mounts (Secure Method)
For thicker or larger letters, or for outdoor installations.
- Drill holes where the studs will go (based on template).
- Insert plastic anchors if required.
- Apply silicon glue to studs and push letters into place.
- Let the adhesive cure fully (usually 24 hours).
Step 5: Final Checks & Cleanup
- Remove any visible pencil marks.
- Gently wipe the letters with a soft cloth.
- Check for alignment and firmness.
For outdoor walls, Swami Ji Outdoors uses UV-resistant materials and waterproof adhesives to ensure long-term durability, even in harsh weather.
Bonus Tips for a Pro-Level Finish
- Use contrasting colours: For example, white letters on a grey wall or black on beige for readability.
- Spotlighting adds drama: Install a soft LED light above or below for a glowing effect.
- Layer for depth: Add a base layer or background panel for extra dimension.
- Get custom fonts: Ask Swami Ji Outdoors for custom-shaped acrylic fonts and logos.
Why Choose a Professional Like Swami Ji Outdoors
While the DIY route is satisfying, not everyone wants to risk crooked letters or adhesion issues. That’s where Swami Ji Outdoors steps in — offering:
- Laser-cut precision
- High-grade adhesives and materials
- Perfect levelling and alignment
- Custom stencils and mounting kits
- Installation service for homes, businesses, and institutions
Wrapping Up
Installing acrylic letters might look intimidating, but with the right tools and a little patience, you can transform any wall into a statement piece. Whether you’re a small business owner branding your space or just upgrading home décor, acrylic signage is modern, durable, and DIY-friendly.
If you ever feel stuck or want a premium finish, reach out to Swami Ji Outdoors — Jammu’s trusted experts in display solutions, LED boards, and custom printing.